SECTION 4 ELECTRICAL ADJUSTMENTS
0 dBm = 0.775 V BASE UNIT
� Make the set in test mode. (See page 7.) � TX Adjustments and Checks � 1. TX VCO Check Setting:
digital voltmeter
deviation meter
7. Check that the value of power meter is �5.5 dBm ± 1.5 dBm. 4. Modulation Sensitivity Adjustment Setting:
AF OSC 600 � LINE jack (J1)
+ �
1 kHz, �20 dBm
+ �
TP (TX VCO), TP (RX VCO) TP (GND)
+ �
TP (ANT) TP (GND)
Procedure: 1. Connect a digital voltmeter to TP (TX VCO), TP (RX VCO) and TP (GND) on the BASE RF board. 2. Check that both TP (TX VCO) and TP (RX VCO) voltage of digital voltmeter are 0.8 V to 2.2 V. 3. Set the [DIAL MODE] switch (S2) to the [TONE] position. 4. Press the [HANDSET LOCATOR] key (S1) three times to change the channel to 40CH. 5. Check that both TP (TX VCO) and TP (RX VCO) voltage of digital voltmeter are 0.8 V to 2.2 V. 6. Press the [HANDSET LOCATOR] key (S1) once to change the channel to 1CH. 7. Check that both TP (TX VCO) and TP (RX VCO) voltage of digital voltmeter are 0.8 V to 2.2 V. 2. TX Frequency Adjustment Setting:
frequency counter + � TP (ANT) TP (GND)
Procedure: 1. Connect an AF OSC to the LINE jack (J1) on the BASE MAIN board. 2. Connect a deviation meter to TP (ANT) and TP (GND) on the BASE MAIN board. 3. Set the [DIAL MODE] switch (S2) to the [PULSE] position. 4. Press the [HANDSET LOCATOR] key (S1) once to change the test mode step to TX MOD CHECK. 5. Adjust RT3 on the BASE MAIN board so that the value of deviation meter becomes 8 kHz ± 0.5 kHz. 5. Distortion and S/N Ratio Check Setting:
AF OSC 600 � LINE jack (J1)
+ �
1 kHz, �20 dBm
distortion meter
Procedure: 1. Connect a frequency counter to TP (ANT) and TP (GND) on the BASE MAIN board. 2. Restart the test mode to change the channel to 19CH. 3. Adjust CT1 on the BASE MAIN board so that the value of frequency counter becomes 926.897468 MHz ± 600 Hz. 3. TX Power Adjustment Setting:
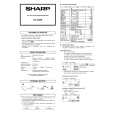
power meter + � TP (ANT) TP (GND)
+ � noise meter
TP (ANT) TP (GND)
+ � CCITT: on
Procedure: 1. Connect a power meter to TP (ANT) and TP (GND) on the BASE MAIN board. 2. Adjust RT301 on the BASE RF board so that the value of power meter becomes �5.5 dBm ± 1 dBm. 3. Set the [DIAL MODE] switch (S2) to the [TONE] position. 4. Press the [HANDSET LOCATOR] key (S1) three times to change the channel to 40CH. 5. Check that the value of power meter is �5.5 dBm ± 1.5 dBm. 6. Press the [HANDSET LOCATOR] key (S1) once to change the channel to 1CH.
Procedure: 1. Connect a distortion meter and noise meter to TP (ANT) and TP (GND) on the BASE MAIN board. 2. Check that the value of distortion meter is less than 4%. 3. Check that the value of noise meter, and record it. 4. Stop outputting the signal of AF OSC. 5. Check that the value of noise meter again. And check that difference of level between in step3 and in step5 is less than 30 dB.