|
|
|
Usuarios conectados
Actualmente hay 6008 visitantes online. |
|
Productos
|
|
Información
|
|
Destacado
|
|
|
 |
|
|
No hay comentarios de productos.
SECTION 1 SERVICE NOTE
[Service Mode]
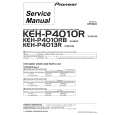
The service mode enables to operate the mechanism of WM-GX680/ 688 while the MAIN board is opened. Rotation of the idler gear (A) (S side) is detected using the photoreflector (PH1) in the WM-GX680/688. PH1 is located on the MAIN board, therefore the rotation of the idler gear (A) (S side) cannot be detected by PH1 when the MAIN board is removed. As a result, the motor cannot be controlled and cannot run correctly. To repair the machine after the MAIN board is removed while the main power is turned on, follow the procedures as described below. 1. Setting 1) Remove the cabinets referring to section �3. DISASSEMBLY�. Open the MAIN board. 2) Connect the motor (M601) and the plunger solenoid (PM901) to the MAIN board using the jumper wires. When the extension jig (1-769-143-11) (10 wires as a set) is used, they can be connected easily. 3) Short the TAPE DETECT switch (S901-2), R TUME switch (S901-1), F TUME switch (S902-1) and ATS switch (S902-2). 4) Connect an AF oscillator to resistor (R43). 5) Connect DC 1.3 V from external regulated power supply to � and � terminals of the battery. 2. PRE-SET status The PLAY, FF and REW modes can be entered only from the PRESET status. 1) Check that the slider (NR) is in the center position (S1), and the FWD/REV switch is also in the center position. When these switches are not in the center position, set them to the PRE-SET status as follows. 2) Move the FWD/REV switch (S1) to the same position as the slider (NR) is set. 3) The slider (NR) can be moved when the main power of the regulated power supply is turned OFF once then back ON. Move the FWD/REV switch (S1) to the center position in synchronism with the timing when the slider (NR) is moved. 3. FF, REW modes 1) Check that the PRE-SET status is set. 2) Connect square wave or sine wave to resistor (R43). (See illustration below.) 3) Press the p switch (S3) to enter the STOP mode. 4) Press the FF PRESET+ switch (S4) and the REW PRESET� switch (S5). 4. PLAY mode 1) Check that the PRE-SET status is set. 2) Connect square wave or sine wave to resistor (R43). (See illustration below.) 3) Press the p switch (S3) to enter the STOP mode. 4) When the 9(REPEAT switch (S9) of the MAIN board is pressed, the slider (NR) moves once to the F side then moves to the R side. When the FWD/REV switch (S1) is pressed in the synchronism with the above timing, the machine can enter the PLAY (R side) mode. Press the 9(REPEAT switch (S9) again, and move the FWD/REV switch (S1) in the synchronism with the motion of slider (NR). It enables the machine to enter into the PLAY (F side) mode. Note 1: When you fail to enter the PLAY mode, re-start from step 1) PRE-SET status. Note 2: Regarding the 9(REPEAT (S9), p (S3), FF PRESET+ (S4), and REW PRESET� (S5) switches, use these switches of the remote control unit as much as possible. Note 3: If a headphones are used, the beep sound shows the timing of the FWD/REV switch (S1).
R TUME SWITCH (S901-1)
TAPE DETECT SWITCH (S901-2)
� MAIN BOARD (SIDE B) �
Plunger (PM901)
AF OSC
ATS SWITCH (S902-2)
F TUME SWITCH (S902-1)
Short Battery terminal � FF PRESET + (S4) Q15 R43 (SIDE A) (SIDE A)
�REPEAT (S9) p (S3)
Square wave (sine wave) 10 Hz, -3.5 dB
Battery terminal �
REW PRESET � (S5)
Short
MENU (S6)
SET (S7)
M M601
ENTER (S10)
BAND (S8)
(S1) FWD�STOP�REV
REC (S11)
�3�
|
|
|
> |
|